31 December 2009
Legit!!
Hey, I just realized that my e-mails from here have been getting dumped into the Spam folder. Sorry if I missed your comment, I don't even know how long that has been going on. Hopefully fixed now.
26 December 2009

14 December 2009
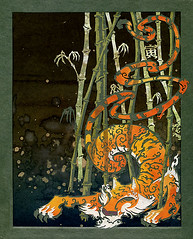
From the Bamboo Forests of the Night
I know I've said it before, but it (obviously) bears repeating: Patrick Gannon's cut paper artwork is The Bomb. If you haven't, go check out his Flickr stream. If you already have, go look at it again. He posts new stuff pretty regularly, and it never hurts to go back and see the older stuff again.
13 December 2009
i dunno lol

I picked up some colored foil last week, and this is what happened to a bit of it today. Dunno what to do with it, but it was fun and looks kinda neat.
11 December 2009
Wait for it....
 OK, then. This is nearly done. There is one patch of blue that needs to be finished, and one patch of red. (I was working on this on my trip to Vienna, and ran out of those 2 colors.)
I kind of hate the green blobs on the right side, and they were NOT part of the original outline. See what I get for my troubles? I may well pick them out, too. The red net is better than I thought, but still not ideal. Etc, etc. Always a critic.
... and then what? I don't know. Stretch & frame? Sew it on to something else, applique style? See if I can get one of my friends who's done textile art to incorporate it into something grander?
There are a few things I would do differently, now that I've done them this way (thanks, learning experiences!), but that's OK. There will be a next time, and I am definitely getting the hang of some of the techniques. As soon as I finish those last two little bits of missing colors, and probably pick out the green blobs, I'm going to (a) get a color-correct photo of this, and (b) put it to bed. Maybe I'll just start a big collection of smallish, irrational embroidery pieces, which will be of great interest to archaeologists and psychologists in some long-distant future.
In other news, when I was in Vienna (Austria, the rest of this paragraph won't make sense if you think I'm talking about some other Vienna), I stopped by the Museum für Angewandte Kunst (Museum of Applied Art) and lucked out: They had a huge exhibit in their textiles ward on Ottoman embroidered textiles. Clothing, furniture ornamentation, bath towels, and so on.
Last time it was fashions made from recycled materials, and although a ball gown made of grocery bags is certainly Something To See, it has a little less immediacy to my own projects. Although I *do* like to reuse common materials, especially if they are meant to be trash. Nevermind, I think you get the point.
Not only did I see a tremendous collection of inspiring designs and workmanship, but learned a few nifty things. I now know where the term "bath sheet" comes from! It was a great exhibit. My only regret is that old fibers can be very delicate in many ways, so the pieces were behind glass in a dimly lit room. But that's OK, it was worth every minute of squinting.
Here is a link to the museum page for this exhibit. I'll update this later if I can find their English language version. There are a couple of pictures there, and a bit of descriptive text. Also, the MAK is awesome for being free to the public on Saturdays. MAK really is one of my favorite museums, both in focus and operation. [eta: in English]
02 December 2009

26 November 2009
And then you threw an octopus at my window
 And here is the current work in progress. What is it? I don't know. I drew the design out, in a fit of responsibility/optimism. I started stitching in the middle, and plan to work my way out. I have an idea how the colors will go, and maybe the textures.
I'm sure there is too much to this design, and I might cut back on my plan to fill it all in (as I am doing with the bit that's already been sewn on), but who knows. The odds are pretty good that I'll get fed up with this and abandon it before it is done, as well. But for now I am quite hopeful, and some day would like to think of some more rewarding application and design for this stuff. Until then, I will be happily picking away at this hoop.
By the way, when I say I've been fixated with this, I mean just that. I've done almost nothing else for the past 3 weeks. Obviously this is a time consuming activity, and I'm probably slower than a person with more experience would be. Or, maybe the problem is that I go too fast and end up with mistakes and so on. I've never been one to let a little thing like that slow me down.
The Little Gloves That Couldn't


The thing about perfunctory research is that sometimes you begin the project and realize you're screwed. So it was with the gloves. Not only was my design for the gloves faulty in oh-so-many ways, but also, I kind of got carried away with the decoration on the gloves. The left on in particular. Also, the right glove. Oh well, it was fun anyway.
3rd Time, not the charm
 The lower/right was totally freehand, as was the black bit on the left. The green marks at the top (with blue stitching over some of it) are the design I thought I wanted, but after doing some with the blue, I realized the lines were far too close together, and I let it go as a waste of time and thread.
Also, I got the crazy idea that I would make a pair of gloves to wear while I work (on paper stuff) because I hate the feeling of paper on my hands.
... so this was left behind, and the gloves were started. After a truly perfunctory amount of research into the manufacture of gloves.
2nd Go
 After that first set of stitches, I decided to do something a little more cohesive--a general design picked out in white thread, and then filled with a variety of colors and techniques. I drew a little bit of this with a pencil, which got graphite all over my white thread. After that, I just went totally freehand, sewing the design directly on the unmarked linen.
But then after many, many, many hours of poking away at this, I decide it might be a little too ambitious. Especially as my skills with certain more complicated stitch patterns were
This was abandoned in favor of a few smaller practice bits. Sometimes I get too excited about a new thing, and forget that I'm new to it, and don't need to shoot the moon the first time.
By the way, if you click through to the larger size of this picture, you should be able to enlarge it even more from there. Possibly to the point of too much detail. The yellow sort of diamond-shaped bit shows particularly well my lack of awesomeness at this point.
Latest Fixation: Embroidery
 Sometime in the past few months, I got hooked on the idea that embroidery and other sewing-related activities might be fun and visually entertaining.
(In case you ever wondered, my Big Artistic Mission is "make stuff that is interesting to look at"...)
So, I picked up one book about embroidery, and was handed the book from a starter kit. Between the two, and an 8 hour transatlantic flight, I was able to pick out a few tentative designs. At the very top (12 o'clock position) are the very first stitches I made. It pretty much had to get better from there...
05 November 2009

30 September 2009
Tote Bag, hand decorated


25 September 2009
Today's Drawing Exercise

This one was a bit more fun for me. The assignment was to make some ink (or coffee, or tea, or whatever) blobs on a page, and when it was dry, look for things for the shapes and spaces to become. I'm probably not done with this, I didn't do much with the negative spaces, mostly worked with the positive shapes. I'm amused by it, and will probably do it again. Just for fun. Ever do your homework twice, just for fun? :)
the death march of progress

I had to take it off the easel and put it back on the wall to start liking it again. There is something about staring at a painting very close up that ruins it. Unless it's a Persian miniature watercolor, which this categorically is not.
24 September 2009
On the other hand...

Actually... the same hand. Hopefully no more hand drawing for a while. By which I mean, oh, ever.
23 September 2009
Baby Squid Baby Shirt

Forgot to say, by request, I worked up a larger version of the Squidly design that's better suited to larger printing. Probably there will be an even larger one later on, but if you know someone whose baby has some kind of Lovecraftian flair, this might be the perfect gift item.
It is a SKILL, not a TALENT.


I can't tell you how many times I've heard that life drawing is a fantastic talent to have. I agree, it would be a fantastic talent to have.... if it were a talent. Which it is not. It's a skill. It can be taught, and frankly, it's not that hard to learn. I suppose it's possible that talent could make it a little easier or faster to learn... but it's also possible that talent makes it MORE difficult to learn, because it seems like it should be easier for an artistically talented person.
For me.... it's more difficult.
Here's why: For a lot of what I like to do artistically, practice isn't a big part of success. Yes, I get better as I do things more often, but in essence, I like the first try, too. This is not the case for life drawing. I get very frustrated with my life drawing skills, and I know it is because I don't practice. I've taken classes, I've read really excellent books about this. I've done a ton of professionally designed exercises. And yet.... I still suck if I don't have step by step guidance. And it's because I don't practice enough.
What you are looking at up above is (left) a drawing of my own hand I made 3 weeks ago, and (right) a drawing of my hand I made this morning, following the explicit instructions in a book by Betty Edwards called Drawing on the Right Side of the Brain: Workbook. If you want to learn to draw, check out her books. They are excellent. The workbook is a really good hand-holder for those of us who are unbelievable slackasses about the practice part of it.
and so it goes
 The big painting has reached a phase where, although daily changes can be seen, they are increasingly subtle. So today I am posting one of my favorite bits, something I just started blocking in yesterday: The Upper Left Corner.
It's not much to look at now, but someday it will be a real highpoint of this painting.
... or so I hope.
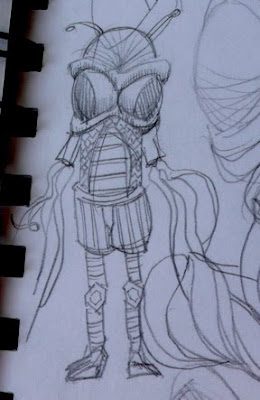
Peeping the Sketchbook
It's been a while since I posted some random pics of stuff in my sketchbook.


.


.
18 September 2009
starshines & rainbows...

Here's the point where I am most likely to lose the plot. Because it has gone from a crisp B&W composition to some kind of schizoid clown barf, with little islands of crispness. And because I'm so drawn to and compelled by those islands, I start to loathe the color swirls just a little bit. Even though I love them. Even though I have the power to bring back the crisp with a few swipes of white paint.
Although I don't really feel 'at home' with acrylic paint just yet, I do love the fact that laying down this much paint has used so little paint. I know a lot of painters like to apply acrylic with a shovel, but I'm more a fan of having just enough paint to cover the canvas with the colors I want. Also, this entire painting has been done with red, yellow ocher, green, and white. I am unreasonably amused to be able to make purple and blue out of that combination.
17 September 2009

15 September 2009
It's always so nice at the beginning.
 As always, click for bigger.
This is the canvas I've just started a few days ago. It's not going to be B&W, I haven't even started painting yet. It's going to be acrylic paint. I really like the design, though. This is why I filled sketch book after sketch book, for years, with black line drawings, and consumed countless black Sharpies along the way... I'd start something like this, intending to color it in, and then fall in love with the B&W, and not be able to bear adding color. What if I didn't love it?!
Then I learned about photocopying...
This won't photocopy, though. It's 30cm x 150cm.
09 September 2009
The First Time Always Sucks

Here's my first go at this, from sketch to trace to wax to plaster model. I'm not even going to bother cleaning up the plaster. The wax isn't what I wanted (size constraint) and the mold making process did not go smoothly--the plaster is weak and crumbly and full of air holes. However, lessons were learned, and I'm hoping more lessons will be learned in the near future. Especially looking forward to the lesson about how this is going to turn out just as awesome as I'd hoped.
Probably going to cast this in resin, in the end. Durable enough, available enough. Has ALL the advantages... :)
06 September 2009

05 September 2009
Dude!
 See that thing in the lower/left? I totally want to make that into a belt buckle. Would you wear a belt buckle like that? What if it had glass or semi-precious stone insets where the circles, tear drops and lens-shaped bits are in the drawing?
Proof of Paint 2

I don't like it, exactly, at least not ALL of it, but I believe it gave me a good idea for the next thing. In any case, I'm done picking at it with the paintbrush.
01 September 2009
Proof of Paint
 Started a new painting today (watercolor). Actually want to do something like this in acrylic, but I was in the watercolor mood. Anyway, here is the beginning. It's probably impossible to see, but this is entirely sketched out. I'm just coloring it in at this point.
Thanks to Regan for asking me for a proof-of-painting photo!
If you wondered at all, I was on vacation the last couple of weeks. Didn't do pretty much anything but read, wander around, and sleep late. It was great. Oh, and I signed up for a Japanese woodblock printing class in early December. Loooking forward to that. Even if the sample print in the catalog looks like crap.
12 August 2009
If at first you don't succeed...
 ... keep making little disasters until you run out of paper/patience. Figured this was better than posting each one of these individually before they go in the bin. There are about 4 square inches of awesome up there. I maybe cut them out and glue them together. The detail on the pic isn't great, even if you click through, but that's OK, they look better that way. Promise.
10 August 2009
Progress +

This photo was taken after the 3rd layer of glaze was applied. Will be putting a 4th layer today. Probably ought to start putting in some side/background paint, hey? Too bad about the dark green just left of lower/center. It just doesn't match anything else--not even the smaller bits of the *same* color on the 3 o'clock position. Grrr.
In other news, can anyone explain to me why cheap toilet paper roll tubes should be a thing? It never occurred to me before that the little cardboard tunnel supporting my TP was over-built. WTH??
04 August 2009
Success!
 On the left is the printing plate-- a sheet of glass with a designed taped to the back side of it, so I know where to make marks. I've colored the design on the top of the glass with watercolor/water soluble crayons. It's faint, because I've already pulled a print from this. On the right is the print that I pulled. More vibrant than the plate, probably 2/3 of the color transferred. There is enough color left on the plate that I can pull one more very faint print without recoloring, or I can add more color and print again at full strength. Or, I can clean the glass and start over entirely.
 This is a crap photo of the final print. It's successful because it is more or less exactly what I was trying to do. The coloration is a little weird and uneven, and not just because it's a low light photo. It's actually weird. The whole image could benefit from some additional paint/ink detailing, and I'm experimenting to find out how much of what's on the page is water soluble (ie, I can alter/move it around with just water), and how much is just pigment, which means it's basically part of the paper now, and everything else goes on top.
Also, if you find yourself wondering, What the hell IS monoprinting, anyway? ... Wiki to the rescue!
Monoprinting?
 First try. Not bad, considering how poorly the next several turned out. I taped a pattern to a sheet of glass, and painted the design on the other side of the glass in watercolor. I tried to pull the print by placing heavy things on top of it all, with the paper being wet enough, I thought, to suck up the paint, most of which had already dried. This *might* have worked if I'd rubbed the paper with a smooth thing, instead of letting it sit--the paper tore a bit when I peeled it up, because it had adhered to the glass, instead of just taking the paint and running off with it.
 This is the 2nd try. The paper was FAR too wet, and the paint was... unwilling. After this, I decided I should probably just go read about how to make watercolor monoprints at home without any print equipment, instead of screwing around wasting a lot of time, energy, paint, and paper. Oh, and enthusiam. For reasons I can't guess, I'm really into this idea right now.
 After doing a bunch of reading about how watercolor monoprints can be made, I tried a few of the recommendations. All together. On one plate. As you can see, it made a relatively uniformly unattractive print. Those recommendations were: a thin base layer of hand soap as a release agent, rub the paper by hand for the transfer, use paper designed specifically for watercolor paint. Although totally uncool, it encouraged me anyway. I'm easy, I guess.
 A print to give me hope! Water-based pens on the left, water soluble/watercolor crayon on the right. The unevenness of the transfer comes from me using a bone folder tool to rub the transfer over. If you click through to the full size pic, you'll see how that's not a very good way to lay the color down, even if it seemed good at the time. I don't have a brayer, or a rolling pin, or anything. Outsider art, baybee!
 This is the first really successful test. The big pink blob is from the paper being a little too wet, but that also was informative. The ghost image at the top is a 2nd pull from the original drawing with easy-wash-out kid's pens. The really vibrant bits of this were added in after I pulled the print, with those same pens. The actual base print was made with watercolor crayons, though.
Matting project continues

Besides being off center, I'm not pleased with this arrangement, I think it probably needs a dark over-mat instead of light. But, whatever, I'll re-do it sometime. As more and more stuff gets matted, the more official things look.
Oily!
 After saying the other day that I don't have the skill with oil paint to make this go, I got annoyed and tried to do it in oil paint. Using a glazing technique (many thin layers of paint, instead of a few fat layers), and a tiny, soft brush.
This is after 2 layers of paint. I have NO idea where I'm going with the colors, or what it's supposed to look like when it's done. The asymmetric colors on a tri-symmetric pattern makes my brain really cranky, but it's probably good for me.
Things that makes me cranky are good, right?
Distraction/Documentation

It's always late at night when I remember that I forgot to take pictures of my most recent work/progress. At which time, I *don't* take pictures because with my lack of suitable lighting, it's virtually impossible to get good pics of flat things at night. Therefore, I hereby state my intention to begin each work day (usually M-F, but sometimes a weekend day also/instead) by taking pictures of whatever I worked on the previous day. Even if it sucks. Even if I stared at a blank sheet all damn day. Even if I'm busy.
Your part in this: If you are the type of person who wants to see stuff, and sees me on AIM or something, feel free to nag. Nag me in LJ. Nag me in e-mail. I hope to get this habit fully formed by the end of September, but we'll see, won't we? We all know how habits go...
Because no post here is really complete without a photo, I give you a snap shot of the pair of gentleman's drawers I saw in old town on the sidewalk on Sunday morning. I've noticed that Sunday morning is the prime time to see underwear on the sidewalk in this town. I make a habit of documenting it photographically, in case someday someone wants to give me a book contract chronicling the Sundarpants phenomenon. Unlike SOME people, I'm not so slack as to set up a web page requesting submissions of same, so I can eventually bundle that into a book. Or, I'm actually too slack to do that. It's definitely one or the other.
01 August 2009
Another Incomplete
This is the current project. The drawing is good, I will probably use it for multiple versions of the finished piece. I *was* trying to set up something for an oil or acrylic painting, but this is too fine detailed for my oil paint skills, and for some reason I'm a little sour on acrylics right now. So, another watercolor/ink deal. Which is FINE. It just wasn't what I'd intended when I started.

Here is a detail from the ink wash part of this (click it for full size). I'm probably going to start coloring it in today, although I'm not yet 100% what the color scheme will be. Probably something I'll be excited by at the beginning and annoyed with at the end, or the other way 'round...

Here is a detail from the ink wash part of this (click it for full size). I'm probably going to start coloring it in today, although I'm not yet 100% what the color scheme will be. Probably something I'll be excited by at the beginning and annoyed with at the end, or the other way 'round...

In progress, which is another way of saying...
... incomplete.

I've been trying to work out how to fill/color this one for over a week now, and it's very frustrating. I haven't found anything totally satisfying yet. This first version is a test of various types of shading, and various types of color (watercolor, pens, colored pencils...) It's not coherent, but it was kind of informative.
I do wish I'd taken a photo of the second version (the one that's got low-key colors and a lot of grey tones) before I started coloring it, because it was all grey tones--I'd inked it with dilute india ink and a paint brush, and where each 'tile' overlapped another, the ink was a tiny bit darker.

It looked nifty, but kind of flat, so I started coloring it. and it's not
bad with this color scheme, but I'm also not satisfied...
so I started adding more tint and shading on top of the color
with a super fine black pen.

After that, I tried a version with all color, and no black or ink. I like that one, but couldn't really decide which color scheme was best, so I tried several.
There were a few other color tests along the way (Blogger only lets me put 5 pictures/post, and the other two weren't all that exciting anyway, so I'm leaving them out.) However! This post might at least be informative for those who think visual art springs fully formed from the brain to the finished product. O! how I wish that were true. It takes so many steps, and so much time, to even begin to approach the realization of the idea.

Before all that, of course, the original pencil version, and an ink tracing to use so the original/design don't get lost or damaged.

I've been trying to work out how to fill/color this one for over a week now, and it's very frustrating. I haven't found anything totally satisfying yet. This first version is a test of various types of shading, and various types of color (watercolor, pens, colored pencils...) It's not coherent, but it was kind of informative.
I do wish I'd taken a photo of the second version (the one that's got low-key colors and a lot of grey tones) before I started coloring it, because it was all grey tones--I'd inked it with dilute india ink and a paint brush, and where each 'tile' overlapped another, the ink was a tiny bit darker.

It looked nifty, but kind of flat, so I started coloring it. and it's not
bad with this color scheme, but I'm also not satisfied...
so I started adding more tint and shading on top of the color
with a super fine black pen.

After that, I tried a version with all color, and no black or ink. I like that one, but couldn't really decide which color scheme was best, so I tried several.
There were a few other color tests along the way (Blogger only lets me put 5 pictures/post, and the other two weren't all that exciting anyway, so I'm leaving them out.) However! This post might at least be informative for those who think visual art springs fully formed from the brain to the finished product. O! how I wish that were true. It takes so many steps, and so much time, to even begin to approach the realization of the idea.


Before all that, of course, the original pencil version, and an ink tracing to use so the original/design don't get lost or damaged.
Subscribe to:
Posts (Atom)