Showing posts with label materials. Show all posts

17 October 2013

More From the Grotto

I started to get some images of some of the prints today ... and discovered that everything was wrong. Still got a few shots, but not nearly as many as I have printed designs. Will have to come back to that project, with some mat board and mounting tape and a bright overcast day, and a LOT more patience.

That said, here are a few little tastes.
A tiny print, don't think the image is even 3" on a side. 

Close up of the tiny print. This image looks grainier than the actual print does. Did I mention, everything was wrong?

One of my recent favorites. Have done this in several colors / color combos. Can't decide which way is up, which is usually a sign that I have done something right.

Detail from the one above. 

This one is another favorite. That plate got changed many, many times, and reprinted after each change. This was my favorite iteration, but I didn't love it at the time, so I only got one good print pulled before it went under the knife again.

Same as the one I posted yesterday, in a much more ... painterly execution. Probably not finished yet, I think I want to add some highlights and outlining by hand. 
Short show & tell, I know. Next step is to get enough mat board to get them all mounted, so they look like something. Maybe even something other people would want.

04 September 2013

Recent Works On Paper. With Paper. Whatever.

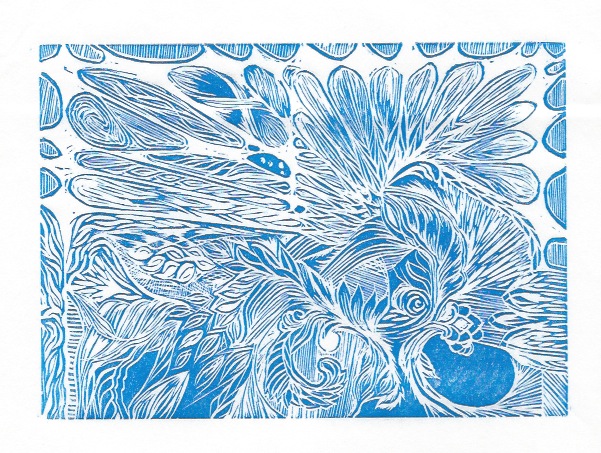
Various permutations of block printing and embossing. The embossing made my brain tingle a little more than the printing, but where they are combined, that was pretty sweet, too. Not as easy to see in these photos, which were made with a telephone.
A heap of attempts. Some were more rewarding than others. It is difficult to tell if the ink is dorked, it was just too hot in the studio, or I don't know what I am doing. Or, you know, All of the Above.

These are cool enough, I figure they deserve large size! The two images were made from the same embossing plate, but the 2nd one had more carving done to it before going through the press. 

The purple is the same plate, block printed. I think this was one of the first prints I pulled with block printing ink. I tried intalio first to see if I liked it (yeah, yeah, I *know* that is not correct usage!) and I did like it, but the photos of those prints are pretty much impossible to decipher. 

08 July 2013

Dry Point Pt 2

I made this plate today, and printed it this evening. I am pleased. (Photographs this time, rather than scans. Much better!)
First run, on heavy heavy paper.

Second run, on super light paper.

Hard to say which is "better" until they are at least both matted, if not framed. Both have pros and cons. Harder to see the pros of the 2nd print in a photo, in person it is the cleaner print. (Light conditions not exactly studio quality.)

07 July 2013

More Printing

Although things here have been a little chaotic, and also much, much too hot and dry, I have managed to get myself out to the studio a bit, and pull a few more prints. I think they are getting better, but I am no Master Printer. Yet.


This is the first print I have pulled of that acrylic dry point plate (that I posted about a couple of weeks ago). It is not so much composed as it is a collection of line sizes / weights / directions / etc. A sampler, if you will. There is so much new in this process for me that I most likely will claim every print as a test print for the next 30 years... This one looks especially funky because it does not fit totally on my scanner bed, and I did not want to mash it down, so the left side curved up and away, and seems blurry. In the actual print, it is not.


Revisiting these blocks. 

The two prints above are reprints of the same one I posted last week, with different technique, and the addition of retarder. Those both were beneficial changes to the process, I think.


This last one, however, actually has had a bunch of new cuts done to the block since last time I printed it. I tries printing this on top of prints I had already pulled (with the old cut), but this is a linocut, and the linoleum has become tremendously warped -- makes alignment / registration difficult. This print looks a little funny because the upper left corner is slightly over-inked, but also because this is a mixture of blue and black inks (plus retarder) just to see how that would go. I kinda like it, except the over-inked bit.

29 March 2011

First, pictures of my new sketchbook! I made this over the weekend. It took me longer than it probably should have, considering how complicated it isn't, but it's been a while since I made a book. Also, I didn't have the right glue, and had to do some dodgey substituting, and then also spray the covers in waterproofing stuff. .... don't ask.
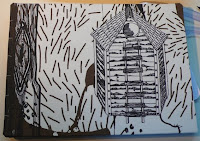
The front cover.

The back cover. The covers are made with a fabric scrap I bought in the Ikea clearance room a long time ago. I bought it with no particular purpose in mind, but knew I would find something eventually. And, so I have. Vindication!

Laying open. Because it's a coptic binding, it opens pretty much totally flat, which is nice. The crease in the standard hardcover sketchbook is problematic. I'd been buying spiral bound for a while, but I don't really love them, they are just a compromise between not opening all the way, and using plain old loose leaves of paper. Which I might do next time.
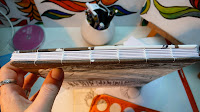
Here's a shot of the spine, in case you were wondering what coptic binding means in practice. Each signature (group of pages) is stitched from the inside to the outside, connecting to the signatures that come before and after it. The first and last signatures are attached directly to the cover boards. It provides exceptional flexibility of the spine, and can also be used for a book of almost any thickness.

This picture shows the inside of the back coverboard, and some of my drafting tools. Not that you really needed to know about that, I just liked the shot.
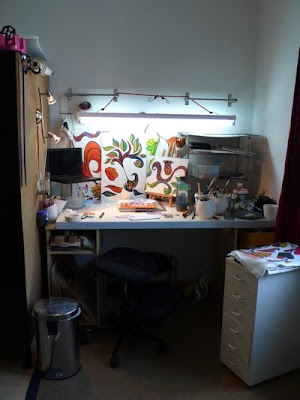

I know it's been a while since I posted the current work in progress, and technically I am not really doing that now. HOWEVER! Here is a picture of my workspace as it sits right at the moment. The panels along the back are the pieces of a custom crate, the center of the desk has a belt buckle design I am finalizing with hopes of begining the actual piece today, and the rack on the right has a bunch of work on paper that needs to be matted, imaged for the portfolio, and filed. Also, some Sequential Tart review materials are there, and my new sketchbook that I made over the weekend.

All the little containers are writing implements, tools, etc. The pink things on the top / left are tape dispensers, which I have needed for a long time. (Yes, it IS "the little things" that make happy happen.)

Little file cabinet is full of more tools / utensils, paints, inks, etc. Trash can on the left, and the cubbies on the desk supports are full of random crap that I need without warning ... but then set aside without warning. It's a functional system, don't judge!

Chair is a swiveling kneeling desk chair. It's not super duper comfortable, but it does save my back and hips. And shoulders and neck. Also, it's really good for keeping my herniated cervical disk from pinching the nerve in my right hand. So ... comfort isn't always immediate gratification.

09 February 2011

Thar she blows ...


shell marker 1
Originally uploaded by Id Marks
Here's the other bookmark that was scratching to get out. Cut by hand, needs clean up in a big way! And, I need better saw blades.

As usual, click through to Flickr for full size, and another view.

02 February 2011

back in the saddle

cicada bookmark

cicada bookmark

I have a provisional goal of doing one small project every day. I accept that this won't happen every day, but it's nice to get to the end of a day and have a Finished Thing to show for it. This is today's Thing -- a bookmark. This is made from copper, and not super-high-polish finished. It's a relatively crude prototype for the next project of the day. Tomorrow, I'll probably go in copper again. Eventually, when I'm happy with the prototypes, I'll move on to silver.

If you're interested to see some COOL metal bookmarks, try here.

17 December 2010

Old Dog / New Tricks

Took a two evening advanced course in acrylic abstract painting, with emphasis on landscape rendering. I went with a water theme, probably because I'd been listening to The Odyssey audio book all afternoon...

Although that style of painting does not especially interest me, the techniques presented did, and the instructor did a fine job of explaining them.

My canvas was, sadly, too small to try them all out at once, as most of them rely on allowing thin layers of paint dry between applications. Obviously this is tough with a small canvas! You can only get so far away from what you've just painted. Everyone else in the class was working with one or more canvasses in the 2'x3' size range, for the most part.

Here is the canvas I painted during class. Currently I have a couple of watercolors in progress, but when I have finished those, I am going to start some acrylic paintings. It seems that having a couple of canvasses going simultaneously is the cure for waiting, and I love trying new stuff. I did come out of the classes feeling pretty inspired to try these techniques, and full of ideas about how to put them to good use.

I admit it was hard not to giggle when several of the other course participants extended sincere sympathy to me, as an apparently obvious total beginner to painting. I took the small canvas (about a foot square) because I've not been feeling well lately, and didn't have a lot of energy for a large painting -- and I *hate* unfinished paintings. Also, carrying it to class and back home in the freezing damn cold on foot kinda sucks. $5 says everyone else in the class came in a car. Since I'd been doing watercolors during the day both days, I ended up painting the acrylic left-handed to give my right a break. Didn't really get into any of that with the other people in the class, though. I was just happy to be there.

There is a summer course, 3 days somewhere north of here, that I will probably sign up for, if I can work out transportation, and get registered before all the spots fill. It does look like fun.

16 October 2010

This Is How It Begins


Candle Sconce Steps 1
Originally uploaded by Id Marks
I started a new project this week, in part to avoid post-partum depression after the tea chest, and in part because I have a HUGE list of projects backlogged (also, after the tea chest...). So, this one is small, but I thought I'd try documenting it pretty well. Looking over the pictures I took, it seems like there were a couple of times I thought, "This would make a great picture," but that was as close as I got to actually making a picture. Turns out, I still don't have that camera-eye. If you're Regan, you can just pull those images from my mind, probably. Everyone else, SOL. Sorry.

This project begins with the broken mirror from an old American Tourister travel case. (thanks, giant ridiculous cat...) And, some coffee. I wanted to make a wall sconce for a candle, and I wanted to do it without buying *anything*, so I was scrounging around for inspiration. And there was the broken mirror. Everyone makes candle holders that sit on tables and shelves, but tables and shelves eventually fill up with crap, or in my case, fill up with cats who are more than happy to knock my stuff onto the floor, whether it is burning or not. There is real appeal in being able to nail something high up on the wall!

Click through to see all the photos so far – about a dozen – with some explanation on each. The project is NOT finished yet, and I probably won't post again until it is. Should be soon, WARNING, that's the kiss of death right there, but when it is done, and I post again, that should be the rest of the photos, including the very first sketch, before I even thought of using the mirror, all the way to the last pic of the candle sconce on the wall with a burning candle in it and a frustrated cat, unable to knock it over.

14 September 2010

Waiting For Glue To Dry

Since I'm waiting for glue to dry in a non-euphemistic, non-metaphorical way, I thought I'd muse on some of the lessons I've learned from this project. It's not over, but since I just bribed myself to work on with an offer of a trip to the office supply if I finish it today, it must be close ('cause it's back to school sales time, squee!)...

One thing I've learned is, this is probably a prototype. I didn't start with a plan, I started with some nice plywood from the 50¢ scrap bin at the hardware store, and some shards of glass I'd painstakingly removed from a broken window here in the apartment. I had many different ideas along the way, and it moved forward very haltingly. And slowly. Part of the slowness was not actually knowing what came next, and having to have a good long think about that. I think the longest was almost a month.

If I had to build it again, by drawing a plan from what I've got now, and making a shopping list, and doing this like a proper project.... it'd most likely be a weekend project, or even just a day project, depending on what I chose to finish the wood / materials. I may test this bold claim. The closer it is to finished, the more sure I am that I can do better, faster, and with greater satisfaction at the end. I can't really 'save' this one, but I could go for a mulligan and be happy with what I get out of it. What I can't do it for is cheaper – this one is constructed almost entirely out of stuff I already had on hand, or clearance bin items. The only things I paid full price for were hardware (hinges, knob, latch).

Another thing I (re)learned is that prototypes are totally worth it. Although maybe next time I should do it in cardboard or something. In art we call that a maquette, or a 'mock up' if we're not being pretentious art school dorks.

In no particular order, further learned things:
  • cut the glass first, cut the holes for the glass after
  • hot glue does NOT work like caulking (don't ask)
  • slate is surprisingly hard to find
  • have a variety of fastening hardware on hand
  • there's a reason some kinds of hardware come in a minimum of 100 quantity
  • sand before sawing, between coats of paint, and after pulling the splinter out
  • if you think something will make a good picture, it probably will
  • measuring is not just for chumps
  • a project that won't end is hugely inspirational - I'm FULL of other ideas now!
  • cheap wood clamps are even worse than you think they'll be

Perhaps the most painful part of all this were the times I didn't have the right tool for something. Doing projects without a fully equipped shop can be fun, especially when you manage to work around a tool or process. A person can feel quite clever when Making Do. (See my contour gauge a few posts back...) but... it's those times when I'm mis-using a tool that I feel like ass. When I'm using a tool for something it was simply not intended for, and I know it. Or when I know without doubt that the problem I have can ONLY be solved by having the right tool, which I can't afford at the moment. Or that the problem I have can ONLY be solved by having a quality example of the right tool, which isn't in the stars at the moment. Those times are a bit frustrating.

07 September 2010

Shotgun Updating

Check me out, two posts in one month! It's starting to get crazy around here!

The formatting on these pictures is going to make me nuts if I goof around with it. So I'm not. Here's the rundown.

Couple sheets of paper with barely visible sketches... sketches for my next couple of projects. Hopefully those projects will be visible.

Bunch o' sticks.... if you can guess what tool I made there, you win a prize!* Double prize if you can guess whether it worked or not.

The re-do on the frame / edge. It took much less time than the first time, and is a thousand times better, but I'm still cross to have had to re-do it. Ahh, well. Live and learn. And re-do crap sometimes.

Quick watercolor painting to test out a brush brought from Beijing by a friend who visited there recently. That sucker can lay down some SERIOUS paint! Highly diggable. It will be my go-to brush of choice for watercolor tidal waves.


224214152 - sorry I didn't answer your question sooner, more pictures to come... behind the windows are pigeon holes.... square openings (16cm I think, a bit deeper than that?).

There will be more pictures when I have the front panel opening and closing and stuff.

Yes.


* There is no prize.

26 May 2010

Art, versus something I could do and get paid for.

Last week, it occurred to me that I could probably make some money by going to the fleamarkt on a Saturday morning, picking out some little prizes, and assembling them (on the spot), and (hopefully) selling them by the end of the day. At the fleamarkt. Somewhere in the intersection of crafting, performance art, recycling, and yard sale. Also, and perhaps most importantly, it could be quite fun. The fleamarkt is basically a pre-sorted landfill, so any and every random thing I could need or want to put into a project would be there. Lamp parts, coffee pots, thermos bottles, LPs. I am very fond of this idea. The only real downside I see here is that it is juuuuuust over my introvert / extrovert threshold. I suppose it wouldn't hurt to try it once and see if I can survive it.

Ideally, I wouldn't actually go there with a plan for a finished item, just see what's there and come up with a concept on the spot. However, for a first run, I imagine a basic plan might be a really good idea, so I'll at least know what tools to take, and what to budget for materials.

Things I already know I'll need:
  • camera (for documentation)
  • something to sit on (there is a little drinking area there, that might suffice)
  • a wide brimmed hat (there is no shade)
  • some money to buy base materials
  • some courage to talk to strangers about what I'm doing / trying to sell
  • a basic tool kit (a way to cut things apart, a way to join things together, a way to clean up rough edges, a way to clean up dirty bits, a few spare parts, and whatever else seems like a good idea)
  • ... other? A bag lunch. 'cause if no one is going with me, I can't just walk away from my project to get lunch, I guess.
Does this idea sound interesting at all? The Mr. wasn't really into it, but he's not really a Maker.

20 April 2010

On the hoop


I don't have an explanation for what this 'is' -- what is it for, where is it going.... I just was seized with the urge to line out a design in needle & thread on cloth, and so I have. It's not *quite* done, maybe one more hour of stabbery. And then.... what? I don't know. Maybe I'll frame it. Or sew it onto something else.

The fabric is something like muslin, but stretchier than I expected. Which is to say, it probably is not muslin. This is what I get for buying scrap fabrics. It's lighter and smoother than the linen I'd been using, and it's not a bad choice, although it is basically see-through. I have been basically doing double-sided stitching (where it looks the same on the top and underneath) because the dark purple thread would make the top look kind of discolored in places.

If you have a use for this, let me know.

2nd storage crate, done.

Here you see the finished crate, as well as the sketch from my sketch book about how I wanted it to look. It's not quite as depth-y as I'd considered, but that's OK. I like the flat, graphic style, too. There are a few things I'd do differently if I were to do this again.

For one thing, the blue paint was not waterproof. Cannot explain it. The white, black, and red were all waterproof, and they all came from the same pack of paint. I was also going for a 'distressed' look for the black upper/background area, but instead got 'splotchy'... ahh well. I think I lost patience when the blue paint turned on me, and I just kinda wanted the project to go away. Ended up having to roll some sealant over this, and it picked up blue paint. Irritating!


But I'm not doing this again. I'm going to do one of the other two crates awaiting decoration. I think the next one is going to be a stenciled repeater pattern. With metallic accents and racing stripe.

15 April 2010

Progress continues!

MacBook for size reference!

I finished cutting out the individual pieces of this today. As of this moment, the plan is to shape and refine the blocks a bit before affixing them to something else. Probably another piece of wood, if I had to make a random guess. Most likely use the Dremel and other things to do the shaping. Haven't decided yet about finishing. Since it's plywood, there isn't going to be a lot of point in highlighting the wood's natural beauty, so paint might be the order of the day. If I really feel like doing a LOT of sanding, I might go for some glossy lacquer type thing.

And, yeah, before you sharp-eyed folks even ask, it is the same knot as on that painting from a couple of months back. I really like this one.

08 April 2010

new toy!

I tried a smallish, probably too-complicated design with my shiny new pack of Pentel Fabric Fun wax dye sticks. It's like a pastel that can be used on fabric, and set into the fiber with a hot iron.

Predictably, they are inclined to be a little muddy in application, especially as they are *very* soft, and can't hold a point at all. So... any amount of precision I want has to be attainable with a tip the size of a pencil eraser. On the other hand, it sets REALLY fast, almost unbelievably fast, and does not bleed at all. And blending is pretty easy.

I tried to make transfers a couple of different ways, but it seems to resist that very capably. I suspect it sort of collapses on itself when it gets heated, so instead of transferring, I just ended up with a few little pills of color and a largely-unmarked cloth. Ahh, well. Will be working with shielding when I am ready to try again. Probably need to put the colors first and the black on top, which is the opposite of how I normally work.

Also on the worktop -


Painting the panels for another storage crate. Thinking I might use this one for paper... This has reached that stage where I hate it, and if I look directly into the abyss, I'll just paint over it and start again. However, I'm NOT looking into the abyss, I'm just filling in the lines with the paint as planned. There is still hope for this.

There are a couple of problems, though -- the paint is not holding its pigment. Surpassing strange, given that it's friggin' acrylic paint. So I'm going to have to put a sealer coat over this when it is done, and possibly the one I finished a while back, as well. Ahh, well. So much for quick & easy. Another problem is that there are a couple of 'sides' of the design that for some reason weren't colored in, and I'm not sure why, or what color to use, and I am limited by how much of these colors I have left. Oh well, not the end of the world. This will be happy when it is over.

14 February 2010

A Painting


Another picture of this thing. I learned a lot about how I should have done this, if I wanted it to look cooler. Enough that it has become difficult for me to be excited about finishing it.

The lighting is weird in this (there is a fluorescent tube above it, so the top really pops and the bottom seems dull), but the color actually is funky in the middle (the sections that seem too-blue actually ARE too blue).

However, in the interest of science, and having a better painting next time, I'm going to finish this one. The knot is monochrome, but it's going to get some highlights and low lights. The background will probably get some of the same. But... different.

"It's Art, you wouldn't understand...." (ha!)

And, I'm on the fence about outlining the knot with black. That was the original plan and I probably will do it because of that. But I figured out how to make it super cool without that. Next canvas, I guess. I picked up 6 of these 50cmX50cm squares on Very Discount last week, they were €3/each. I had been thinking of doing a set of 4 related paintings (Diptych, Triptych... Quadratych?) But I can decide about that after I've done the next one in this flavor, but will all the learning experiences applied. One of the things I'm learning about is effective use of low relief with acrylic paint. Most of my other paintings have been very flat (no relief) which robs them of depth, even if I painted some shading/depth modeling into the composition. This one has much more texture – I'm still getting the hang of that – and is a better painting for it.

13 December 2009

i dunno lol


I picked up some colored foil last week, and this is what happened to a bit of it today. Dunno what to do with it, but it was fun and looks kinda neat.

18 September 2009

starshines & rainbows...


Here's the point where I am most likely to lose the plot. Because it has gone from a crisp B&W composition to some kind of schizoid clown barf, with little islands of crispness. And because I'm so drawn to and compelled by those islands, I start to loathe the color swirls just a little bit. Even though I love them. Even though I have the power to bring back the crisp with a few swipes of white paint.

Although I don't really feel 'at home' with acrylic paint just yet, I do love the fact that laying down this much paint has used so little paint. I know a lot of painters like to apply acrylic with a shovel, but I'm more a fan of having just enough paint to cover the canvas with the colors I want. Also, this entire painting has been done with red, yellow ocher, green, and white. I am unreasonably amused to be able to make purple and blue out of that combination.